The Gingerbread Cottage
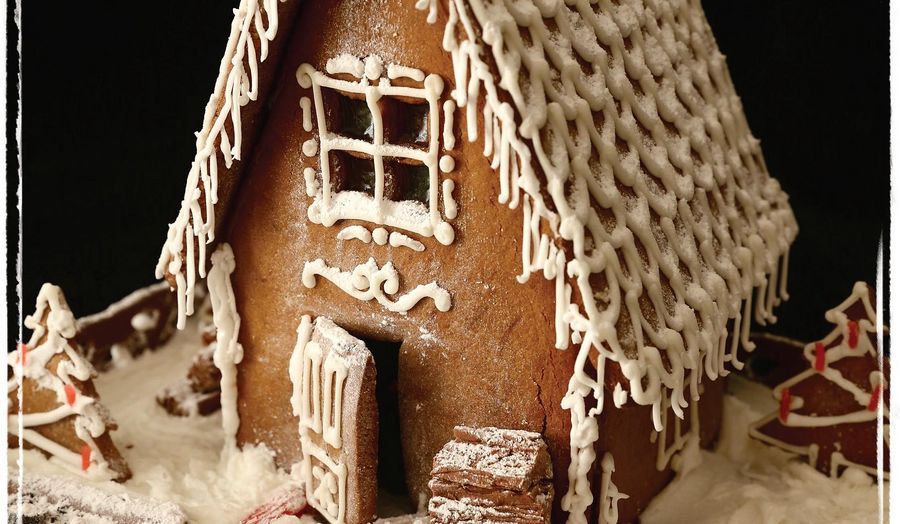
This Christmas make the ultimate Gingerbread Cottage with this recipe from Ms Marmite Lover. Decorated with pretty royal icing, this gingerbread creation will wow.

Introduction
A gingerbread cottage makes a spectacular centrepiece for a woodland tea. Here are my step-by-step instructions, but you don’t have to follow everything I’ve suggested – think up your own ideas and simply use this as your starting point. There are several templates available to download from the in-
ternet, from simple A-frame houses/gottages to complex colonial-style mansions. It’s probably best to start simple. It’s essential that the gingerbread pieces bake as flat as possible: this is not just baking, but architecture. Bendy pieces won’t fit together.
A gingerbread cottage will last for weeks if kept in a cool, dry place, but do allow your guests to eat it. Once I gave each table a small sparkly hammer to do a demolition job at the end of the meal. I’ve rarely seen such joy on the faces of adults. This recipe gives you quite a light gingerbread bake. I’ve tested several recipes and I found this to be the best. You’ll need to start this recipe a couple of days before you plan to serve it.
Ingredients
| 250g | unsalted butter, softened |
| 200g | dark muscovado sugar |
| 10 tbsp | golden syrup |
| 600g | plain flour |
| 2 tsp | bicarbonate of soda |
| 4 tsp | ground ginger |
| 1 tsp | ground allspice |
| 1 tsp | ground cinnamon |
| Boiled sweets in different colours (to create the windows) | |
| 200g | caster sugar and 180ml water, for the caramel |
| Vegetable oil, for greasing | |
| FOR THE ROYAL ICING | |
|---|---|
| 1 | egg white |
| 250g | icing sugar |
| A few drops of lemon juice | |
| FOR DECODATION | |
| Red liquorice laces, for the Christmas tree ‘candles’ (optional) | |
| 2–3 | Cadbury Curly Wurly chocolate bars, for the fence |
| Chocolate ginger biscuits, for the vegetable patch | |
| Oreo cookies, crushed, for the earth | |
| Flower- and vegetable-shaped sweets, for the owers and vegetables | |
| Fizzy laces or mini Daim Bars, for the pathway | |
| 1–2 | Cadbury Flake bars, or cinnamon cassia sticks, for the logs |
| Icing sugar, to dust |
Essential kit
You will need a small heart-shaped cutter (for the windows), a Christmas-tree cutter, a piping bag fitted with a small plain nozzle, a cake board and a heatproof pastry brush.
Method
EQUIPMENT
*Small heart-shaped cutter (for the windows)
*Christmas-tree cutter
*Piping bag fitted with a small plain nozzle
*Cake board
*Heatproof pastry brush
*Lots of patience
First, you need to make a very simple gingerbread dough by mixing together the butter, muscovado sugar, golden syrup, our, bicarbonate of soda and ground spices to make a dough. If it is too dry, add
a drop or two of cold water to bring it all together. Separate it into 6 pieces (4 for the walls and 2 for the roof) and flatten each piece into a patty shape. Cover with cling film and refrigerate overnight.
The following day, download a template from the internet, or draw one on paper and cut it out.
Preheat the oven to 180°C (gas 4). Line 2 baking sheets with parchment paper. Roll out the gingerbread dough on a lightly oiled work surface to 5mm thickness and cut out all the pieces using your template. A little pro-trick is to buy rolling pin ‘guides’ to help your rolling out stay even.
Lay the gingerbread pieces at on one of the prepared baking sheets. Place boiled sweets into each window frame. For mine, I used one red and one yellow sweet and cut out one of the windows in a
heart shape for a classic Hansel and Gretel look.
Bake for 10–15 minutes, until the gingerbread is baked and the sweets have melted to fill the windows. Remove from the oven and leave all the pieces to cool completely on the baking sheet.
Meanwhile, collect the scraps of dough, and roll them out to 5mm thickness. Cut out a door, some
Christmas tree shapes and a few spare pieces of gingerbread cottage shapes in case of breakages, and transfer them to the second prepared baking sheet.Bake, as before, for 10–15 minutes, then leave to cool completely on the baking sheet.
Decorating Your Gingerbread Pieces
Make a royal icing by mixing 250g of icing sugar, 1 egg white and a few drops of lemon juice until smooth. Double the recipe if you are going to use a lot of icing. Put it straight away into several small airtight containers, as it goes hard with exposure to air.
Prop a disposable (or other) piping bag inside a jug and spoon some of the icing into it. Push it right down to the tip of the bag and roll up the top. If not using a small plain nozzle, use scissors to snip off a tiny bit of the end of the bag (the hole will get bigger as you pipe). Pipe your icing on to the gingerbread roof, windows and door, using the guidelines below. It takes a little practice to get the pressure and the size of the tip right, but it’s great fun. Practice first on a spare bit of gingerbread to make sure the size of the piping hole is just right and increase it if needs be.
To make a pattern that resembles roof tiles (see overleaf), use a ‘lasso’ motion. Start with a small blob
of icing and use it to hook the icing on, then pipe the icing in a U-shaped loop and pin it down with another small blob of icing. Repeat the pattern, joining each ‘U’ so that it continues in a line across the roof.
Continue making lines underneath each other until the whole roof is covered in ‘tiles’. Make sure you pipe the roof ‘tiles’ the right way round. On an A-frame house/cottage the large roof pieces have the shorter sides at the top and bottom.
To decorate the Christmas trees, pipe around the edge of each biscuit, then pipe wavy lines at a diagonal slant across each tree. I then added tiny pieces of red liquorice lace to my Christmas trees to make ‘candles’ for the end of the branches. Leave it all to dry for 24 hours so that the icing
hardens properly, then assemble as given overleaf.
How to Construct Your Gingerbread Cottage
There are two main techniques used to stick gingerbread pieces together, one using royal icing, the other using caramel. I use the caramel method because it is faster, but it’s not as effective when the weather is hot as the caramel tends to melt.
To make the caramel, put the 200g caster sugar and the 180ml water into a medium pan and bring to the boil over a medium heat (give the pan a shake every so often rather than stirring). Reduce the heat to low and simmer until thickened and light brown, about 10 minutes. Remove from the heat and use immediately. If it starts to harden during the process of building, gently warm it up again in the pan.
Protect the surface of your table with parchment paper or a silicone mat and place the cake board on
top so that you don’t have to move your gingerbread cottage once it is stuck together. Move any kids/pets back as caramel is dangerously hot.
Use a jug or cup to prop up the gingerbread pieces and position your four gingerbread walls – the two
tall walls opposite each other and the two small walls at either end.
Dip the bottom edge of one of the tall walls into the hot caramel so that it is covered in a thin layer and stick it in place on your cake board. Take one of the small walls and dip the bottom edge and one of its side edges into the hot caramel, then stick it to the cake board and the edge of the secured tall wall. Make sure the edges have contact all the way down. Repeat with the other small wall so you have three walls in place. You can now take the jug away and it should stand on its own.
Don’t dip the fourth wall into the caramel. Dip a pastry brush into the hot caramel instead and paint the two edges that will connect the fourth wall to the gingerbread cottage, then attach it to the sides that are already standing so that all four walls are attached. Brush extra caramel on to any corners to secure, as needed. You can do this on the inside of the cottage, to hide any messiness.
Using the pastry brush or a teaspoon, paint or drizzle a layer of hot caramel along the top edges of one side of the cottage. Position one roof piece on to the frame of the cottage. Hold in place until secure, then repeat with the second roof piece. Brush more hot caramel on to the join at the top of the roof to make sure it’s really secure. At a later stage, you can pipe some royal icing on to the edges of the cottage to cover up the caramel bonding if you want.
Creating a Woodland Scene
To complete your woodland scene, pipe some icing on to the doorframe and stick the door on to it, so it looks propped open.
Construct a fence around the edge of the board using Curly Wurly bars (they bend slightly), fixing either end to the board with a blob of icing.
Make a vegetable patch with 4 chocolate fingers as ‘borders’, afixing these with royal icing. Fill the inside with ‘earth’ made from crushed Oreos. You can make “owers and vegetables out of sweets or use suitable ready-shaped ones.
Attach your gingerbread Christmas trees to the board using royal icing and then use fizzy laces, one
lace either side of the front door, or piece together mini Daim bars, to make a pathway. Make a pile of
logs next to the front door with halved Flake bars or cinnamon sticks.
Finally, use a tea strainer to sprinkle the cottage and garden with icing sugar. This covers up a multitude of sins and gives a romantic look to your finished gingerbread cottage.
Reviews
Have you tried this recipe? Let us know how it went by leaving a comment below.
Our team will respond to any queries as soon as we can - this may take longer over weekends. You do not need to resubmit your comment.
Please note: Moderation is enabled and may delay your comment being posted. There is no need to resubmit your comment. By posting a comment you are agreeing to the website Terms of Use.