Tarte Tatin
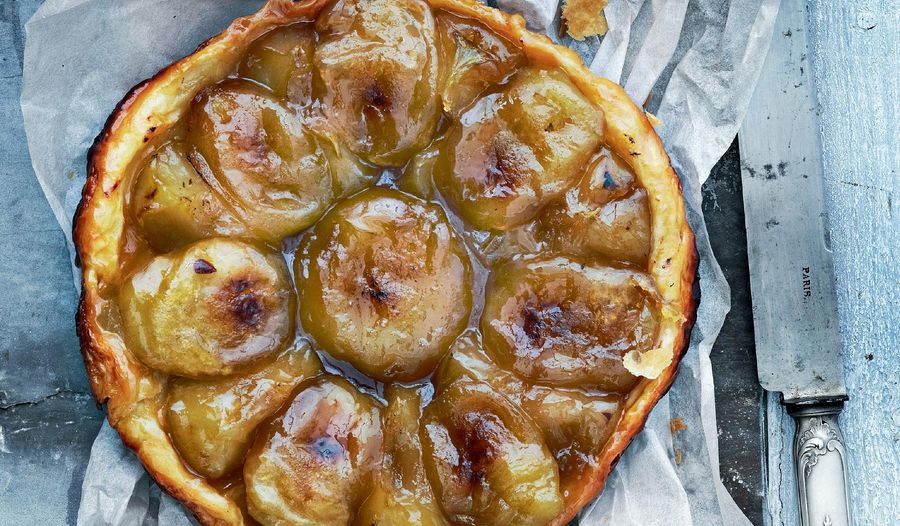
A famous French recipe, ideal for a dinner party. This tantalising tarte tatin brings together warm apples with rich butter and cinnamon in a puff pastry case.
From the book
Buy From
Introduction
I’m sure everyone knows the story of how this tart is supposed to have been created accidentally by les demoiselles Tatin, the Tatin sisters, but in case you haven’t … One of the sisters is said to have been softening apples in butter and sugar for an apple tart, then realised that she had left them in too long so they had caramelised and were sticking to the pan. She tried to rescue the situation by putting the pastry over the top, popping the pan into the oven, then turning the whole thing over to serve it. The guests at the hotel where the sisters worked apparently loved it. Whether the story is true or not, the tart has become one of the most famous desserts. There is an assumption that tarte tatin is difficult to make, but when I teach people how to do it, they usually find that the only tricky part is turning the tart over when it has been baked. I think it helps to make it in a frying pan rather than in a tin because you can hold onto the handle to turn it over. There are various schools of thought about how to make the tart. Some people slice the apples, others halve them, which is the way I prefer. Some people fill the pan with sugar then put in the apples, cover them with pastry and put the pan into the oven straight away, but this way you run the risk of the sugar becoming only a light, rather anaemic-looking caramel. I prefer something a bit darker and more toffee-like, so I start the tart off on the stove to get the caramel going. The key is to do this slowly and carefully so that the sugar doesn’t get too dark, or even burn, and become brittle – more like toffee apple than tarte tatin, and not good for the teeth. Choose eating apples that have a good balance of sweetness and sharpness, such as Cox, Braeburn or one of the characterful local or heritage varieties you can often find in farm shops or markets.
Ingredients
| 1 | quantity of home-made Puff Pastry (see p44 of Pastry for the recipe) or 500g of good ready-made butter puff pastry |
| 6-8 | eating apples, such as Cox or Braeburn |
| 100g | good butter |
| 200g | caster sugar |
| A pinch | of cinnamon |
Essential kit
You will need a 22 cm ovenproof frying pan.
Method
Preheat the oven to 200°C/Gas 6.
Skim a fine film of flour over your work surface, roll out the pastry until it is 4—5 mm thick and large enough to fit loosely in a 22 cm ovenproof frying pan. Prick the pastry well all over and either lay it on a large plate, or place a sheet of greaseproof paper over the top and roll it up, then put it into the fridge to rest while you prepare the apples and sugar.
Peel the apples, then cut in half from top to bottom and remove the cores.
Melt the butter in the frying pan over a medium heat. Sprinkle the sugar and cinnamon over it and cook gently for about 1 minute. Quickly arrange the apples, flat-side upwards, in the pan and keep over a medium heat, shaking it from time to time to ensure that the apples don’t stick to the bottom. Don’t worry if you can’t fit in all the apples initially; they will shrink a little as they cook and you will be able to squeeze in more as necessary. You need to pack the apples tightly together so that the tart holds its shape when you turn it over.
Continue cooking gently and shaking the pan until the sugar turns to a rich caramel — this will take about 30 minutes. Remove the pan from the heat and rest it for 5 minutes.
Remove the pastry from the fridge and lay it loosely over the top of the apples. It needs to tuck in around the edge of the pan until it almost touches the caramel. The best way to do this without your fingers touching the caramel, which burns very badly, is to use the back of a teaspoon to nudge the pastry into place.
Bake for about 30 minutes, or until the pastry is really dark golden brown. Don’t forget that when you flip the tart over after it is baked, the pastry is going to be the base, holding the apples and caramel together, so it needs to be really well coloured and crispy, otherwise it will become soggy with the juices from the apples.
Remove the pan from the oven and leave to cool for about a minute. This lets the caramel set a little and also makes it safer to turn out, but still take care as the caramel will still be hot.
To turn out, place a large plate over the pan and, holding both plate and pan firmly turn them over together so that the tart is apple-side up on the plate. You can serve the tart cold, but I think it is best warm, with crème fraîche or vanilla ice cream.
For a little twist to the classic recipe, I suggest you use a butter flavoured with sea salt; it will give a gorgeous salted caramel flavour to the tart.
Reviews
Have you tried this recipe? Let us know how it went by leaving a comment below.
Thank you for your rating. Our team will get back to any queries as soon as possible.
Please note: Moderation is enabled and may delay your comment being posted. There is no need to resubmit your comment. By posting a comment you are agreeing to the website Terms of Use.
