Marbled Paper White Chocolate Bars
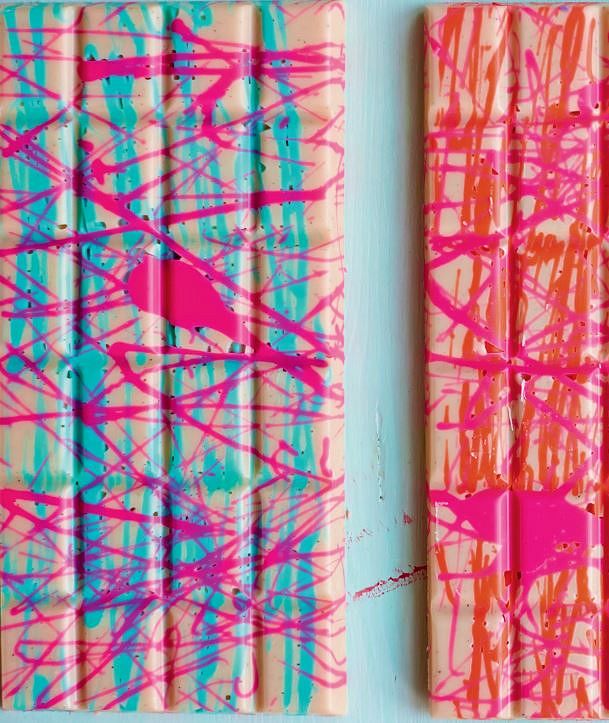
Everyone loves getting a chocolate bar, but these home-made marbled ones make an extra special gift! Use the Meringue Girls’ easy method for tempering, and personalise each bar and wrapper with different food colouring for the person who will be receiving it.
Introduction
We’ve fallen in love with the Mast Brother’s chocolate and their beautiful packaging, and wanted to create our own personalised chocolate bars. We have marbled our own paper, which is deceptively simple, and produces a wicked psychedelic effect, man.
We’ve also gone a bit coco loco with splattered coloured white chocolate bars.
Ingredients
| 300g | good quality white chocolate, or couverture chocolate drops |
| 3 | chocolate bar moulds |
| Wilton oil-based food colouring, used sparingly because it can affect the flavour | |
| A4 thin white card | |
| marbling paints |
Method
To marble your chocolate wrappers, fill a deep baking tin with cold tap water. Drip small dots of marbling paint onto the water – they are oil-based, so they will float – then use a toothpick, or the back of a spoon, to move and marble the floating pattern. When you are happy, carefully place the A4 card flat on the water, then pick it up and turn over to reveal the beauty. Leave to dry completely in a warm place. This can take up to three days.
This type of tempering is a little less accurate, but it’s good if you don’t have a digital thermometer or much time.
Use couverture chocolate drops, or grate or finely chop your good-quality white chocolate into fine pieces. Grating the bar, or using little button drops, means that it melts faster, so is less likely to overheat and lose its original temper. If you are grating lots of chocolate, it’s quicker to just blitz it in a food processor until it’s in little bits.
Place roughly two-thirds (just do this by eye) of the grated chocolate in a microwaveable plastic bowl (not glass, as glass conducts too much heat in the microwave and will continue to cook the chocolate when you don’t want it to).
Put your microwave on its lowest setting, and heat the chocolate in 10-second blasts. Take the bowl out and stir after each blast. It will take around five 10-second sessions to melt the chocolate. You want it so that it JUST melts when you stir it. If you are doing it on the hob, place the chocolate in a heatproof glass bowl over a bain-marie and stir until it JUST melts.
Now add the reserved one-third of melted chocolate and stir until it melts. You may need to give it another 5-second burst in the microwave, or one more stir over the bain-marie, until it all comes together.
Pour out a little bit of the tempered chocolate into as many jugs as you want to colour. Add a few drops of the Wilton oil-based food colouring (use sparingly because it can affect the taste) to your jugs of chocolate and stir through. Now using a spoon drizzle and splatter the coloured white chocolate over your chocolate bar moulds. Leave to set for about 10 minutes in a cool place, not in the fridge.
Now pour over the rest of your tempered white chocolate to fill the moulds. When you have finished smooth off the top of each mould with a palette knife. Again leave to set in a cool place, not in the fridge, before removing the chocolate bars in the moulds. Wrap the set, marbled chocolate bars in foil, before wrapping them in your dried gorgeous marbled paper.
Watch the recipe here:
Reviews
Have you tried this recipe? Let us know how it went by leaving a comment below.
Our team will respond to any queries as soon as we can - this may take longer over weekends. You do not need to resubmit your comment.
Please note: Moderation is enabled and may delay your comment being posted. There is no need to resubmit your comment. By posting a comment you are agreeing to the website Terms of Use.