The TARDIS
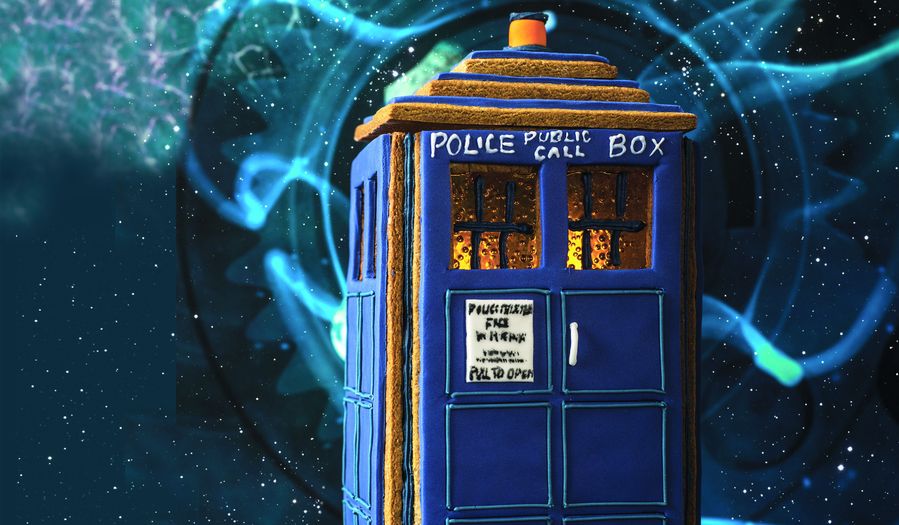
Consider yourself a Whovian? Then you need to bake this impressive Gingerbread Tardis for your next Doctor Who marathon. This makes the perfect centrepiece for a birthday party or Halloween table.

Introduction
The world’s most famous police call box is, in this case, made of cake in the centre and a biscuit frame. It’s specially designed so that the roof lifts off for positioning a battery-powered light behind the windows. This cake is another great bake-ahead party centrepiece. You can make the entire cake, except for the window panes, three days in advance, then add the window panes a day or two before serving as they’re liable to soften if left for longer. Cover loosely with cling film and keep it somewhere cool and away from inquisitive fingers!
Ingredients
| For the cake: | |
|---|---|
| 225g (8oz) | slightly salted butter, softened |
| 225g (8oz) | caster sugar |
| 2 tsp | vanilla extract |
| 4 | medium eggs |
| 300g (11oz) | self-raising flour |
| 3 tbsp | milk |
| For the biscuit dough: | |
| 350g (12oz) | plain flour |
| 1 tsp | baking powder |
| 2 tsp | ground cinnamon |
| 100g (3½oz) | firm slightly salted butter, cut into small pieces |
| 150g (5oz) | light muscovado sugar |
| 2 tbsp | black treacle |
| 1 | medium egg |
| 1 | medium egg yolk |
| 8 | clear orange-coloured boiled sweets |
| To decorate: | |
| 350g (12oz) | icing sugar |
| 1 | medium egg white |
| navy blue and black liquid food colouring | |
| 400g (14oz) | navy blue ready-to-roll icing |
| small bit each of orange and white ready-to-roll icing | |
| 100g (3½oz) | butter, softened |
Essential kit
You will need: a 20cm (8in) square cake tin, 2 paper piping bags each fitted with a fine writing nozzle, a fine paintbrush, a 20–23cm (8–9in) square silver cake board, 1 paper piping bag fitted with a large writing nozzle or a fine star nozzle, and a battery-powered tealight
Method
Preheat the oven to 160°C/325°F/Gas 3. Grease and line the base and sides of a 20cm (8in) square cake tin. Grease the lining paper.
For the cake, put the butter, caster sugar, vanilla extract, eggs, flour and milk in a bowl and beat with a hand-held electric whisk until pale and creamy. Turn into the tin, level the surface and bake for about 45 minutes or until just firm to the touch and a skewer inserted into the centre comes out clean. Turn out onto a wire rack and leave to cool.
For the biscuit dough, trace the TARDIS template (see below) onto paper and cut out. Put the flour, baking powder and cinnamon in a food processor. Add the butter and process until the mixture resembles fine breadcrumbs. Briefly blend in the muscovado sugar. Add the treacle, egg and egg yolk and process to a paste.
Increase the oven temperature to 200°C/400°F/Gas 6. Line two baking sheets with baking parchment. Divide the dough in half and roll out each half to a 3mm (1/8in) thickness. Transfer to the baking sheets and chill for 30 minutes.
Lay the TARDIS template on the dough and cut out four sections, not forgetting to cut out the windows from each. Re-roll the trimmings if necessary and cut out one 12cm (5in) square, one 8.5cm (3½in) square and one 6cm (2½in) square. These will form the roof. Bake the biscuits for 15–17 minutes or until they look cooked and are slightly darker around the edges. Leave to cool completely on the baking sheets.
Beat 200g (7oz) of the icing sugar with the egg white until smooth. Transfer a quarter to a small bowl and keep tightly covered with cling film to prevent a crust forming. Beat navy blue food colouring into the remainder to colour it deep blue. Keep this tightly covered.
Trim 3mm (1/8in) off all the sides of the TARDIS template (you might need to cut out another one if the original has become greasy or you’ll mark the icing). Thinly roll out the blue ready-to-roll icing on a surface dusted with icing sugar and cut around the TARDIS template. Dot a little of the blue icing from the bowl over one TARDIS biscuit (you only need the merest scrape) and position the rolled-out blue icing on top. Repeat on the remaining three biscuits.
Use more of the blue ready-to-roll icing to cover the biscuit squares so you have a thin border of biscuit left around the edge of each square. Stack these together to shape the roof. Shape a small piece of orange icing for the roof light and secure to the top of the roof with a dot of icing.
Put the white icing from the bowl into a small piping bag fitted with a fine writing nozzle. Use to pipe POLICE PUBLIC CALL BOX at the top of one TARDIS side. Put half the blue icing in another piping bag fitted with a fine writing nozzle and pipe six square panels onto each side. Shape and position a small rectangular notice to one side and a small white door handle using the white ready to roll icing. Write the notice in black food colouring using a fine paintbrush. Leave to dry out overnight.
To assemble the TARDIS, beat together the butter and remaining icing sugar until pale and creamy. Slice off any domed crust from the cake and cut the cake accurately into quarters i.e. four squares (you’ll only need three pieces so the remaining piece can be eaten or frozen for another time). Sandwich the three cakes on the centre of a 20–23cm (8–9in) square silver cake board with half the buttercream. The assembled cake must be no taller than 13cm (5in). If necessary, slice a little off the top. Spread the remaining buttercream around the sides of the cake. Carefully secure the TARDIS panels to the sides of the cake, pressing them gently into position.
Put the remaining blue icing in a piping bag fitted with a large writing nozzle (or a fine star nozzle). Use to pipe lines of icing down the sides of the TARDIS where the panels meet. This will seal any gaps and will set to hold the TARDIS in place.
To finish the windows, preheat the oven to 200°C/400°F/Gas 6. Line a baking sheet with baking parchment. Draw four 9 x 5cm (3½ x 2in) rectangles onto the parchment, turn the paper over and position two orange sweets in the centre of each. Bake for 5 minutes or until the sweets have melted to fill the rectangles (you might need to tweak the melted sweets into the corners of the squares. Don’t worry if they run over the edges). rectangles to harden for about 15 minutes until brittle. Pipe dots of blue icing around the rim inside one of the TARDIS windows. Carefully lift one of the sweet panels off the paper and press gently onto the icing to hold the window in place. Repeat on the other three sides. Pipe blue icing window panes onto the outside of the windows and around the roof light.
Rest a battery-powered tealight on top of the sponge cake ready for switching on, then carefully rest the roof on top.
COOK’S TIP: This is quite a fiddly and time-consuming bake, but looks stunning and is so rewarding to make, particularly if you light it up! Take extra care when shaping and baking the TARDIS panels. If they’re wonky or irregular the cake will be difficult to assemble and more likely to break. For accurate piping it’s also worth buying metal writing nozzles in two sizes. One for the white writing and side panels and a larger one or fine star nozzle for piping the windows and corners. Both can be achieved by using a disposable bag and cutting off the tip, but a nozzle gives more professional results. To serve the cake, scatter crushed digestive biscuits around the base to resemble desert, desiccated coconut for an Arctic setting, green-coloured desiccated coconut for grass or blue-coloured sugar for ‘space’.
Watch how to make the TARDIS here:
TARDIS template:

Reviews
Have you tried this recipe? Let us know how it went by leaving a comment below.
Our team will respond to any queries as soon as we can - this may take longer over weekends. You do not need to resubmit your comment.
Please note: Moderation is enabled and may delay your comment being posted. There is no need to resubmit your comment. By posting a comment you are agreeing to the website Terms of Use.