Cinnamon and Cardamom Scrolls
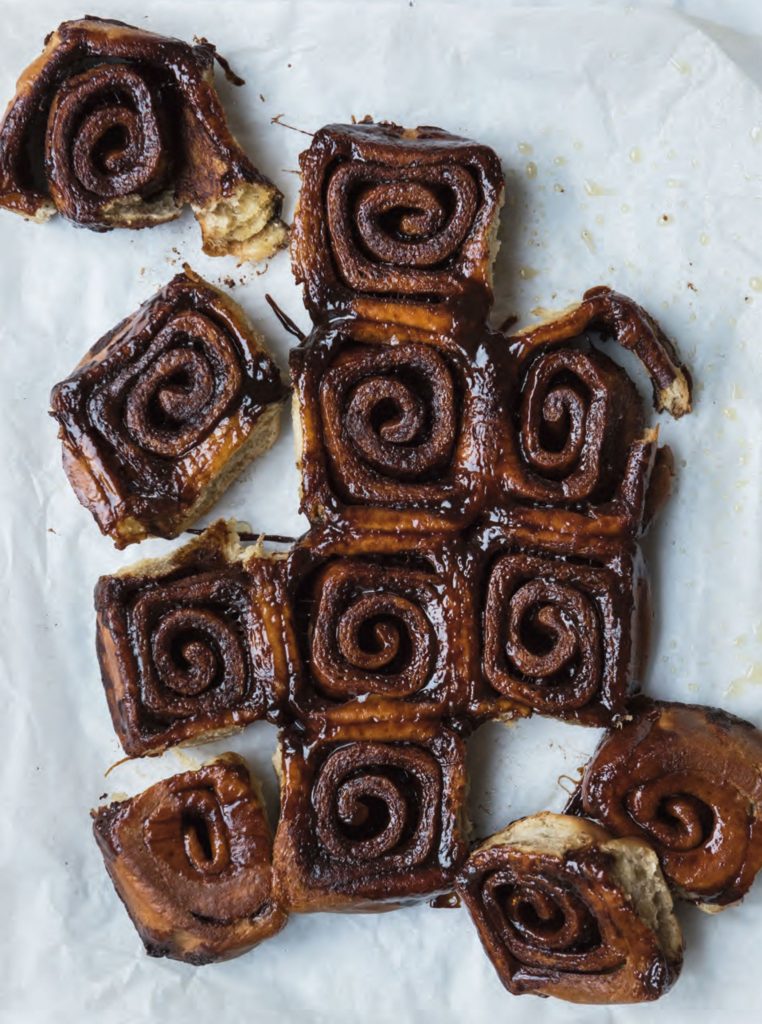
This recipe for sticky, sweet, Scandinavian cinnamon and cardamom rolls makes a perfect weekend baking project. It’s easy to make your own cinnamon buns with these simple instructions from Bread Ahead.
From the book
Buy From
Introduction
These buns! Sticky, buttery and with a heady aroma of cinnamon and cardamom, they are hard to resist, and are the perfect excuse to justify elevenses. I (Louise) was always being asked for these bad boys in our Nordic Baking class, so here they are!
Download the ebook version of Baking School, reduced from £25 to £4.99 for a limited time only here.
Ingredients
| 300g | full fat milk |
| 80g | caster sugar |
| 10g | fresh yeast |
| 2g | fine sea salt |
| 3 tsp | ground cardamom |
| 1 tsp | cardamom seeds, crushed |
| 100g | unsalted butter, melted |
| 1 | egg |
| 1 | egg yolk |
| 450g | plain flour, plus extra for dusting |
| 50g | rye flour |
| Olive oil, for the bowl | |
| For the filling: | |
| 180g | softened, unsalted butter |
| 225g | soft dark brown sugar |
| 75g | soft light brown sugar |
| 20g | ground cinnamon |
| For the sticky glaze: | |
| 200g | caster sugar |
| Juice of 1 lemon | |
| Juice of 1 orange | |
| 1 | cinnamon stick |
Essential kit
You will need a baking tray and a wire rack.
Method
To make the dough, put the milk, sugar, yeast, salt, ground and crushed cardamom, melted butter and egg, plus yolk, into a large bowl and whisk together for just 30 seconds. Gradually add the flour and mix with one hand until it is all incorporated into a dough.
Scrape the dough off your hand back into the bowl, then scrape the fairly sticky dough out of the bowl onto a floured work surface. Make sure you scrape all the dough out with a scraper to leave a clean bowl, keeping the bowl, as you will need it later.
Now, with your dough on the work surface, ‘stretch and tear’ it for about 6 minutes. ‘Poised like a puma’ (your hand in a claw shape resting above the dough), with the heel of your hand push the dough into the work surface and ‘stretch and tear’ the dough forwards, then grab it and bring it back to where you started the ‘stretch and tear’. Repeat for 6 minutes. Make sure you scrape your dough into the centre throughout the process to make sure it gets developed evenly. After a few minutes you should be able to feel the start of development in the dough. After 6 minutes, form the dough lightly into a ball and cover with a cloth, then leave for 10 minutes to relax.
Rub all over the inside of the bowl you used earlier with the olive oil, then, when the 10 minutes are up, reshape the dough into a round and place it in the centre of the bowl.
You now need to fold the dough. First, pick up the top two corners and pull up, stretching the dough upwards, then fold over to the opposite side (the first corners should meet the opposite two corners). Next, pick up the bottom two corners and again pull up, stretching the dough up and over, and fold to the opposite side. Now repeat for the left- and right-hand sides, then flip the whole of your dough over, so that the bottom becomes the top.
After folding, leave the dough to rest for 30 minutes, then give the dough two more folds, resting for 30 minutes each time. Between folds you will need to cover the bowl with cling film, a tea towel or a shower cap. After the final fold, put it into the fridge for 30 minutes – this will just firm up the dough ready for rolling out.
To make the filling, beat the softened butter, sugars and cinnamon together in a bowl until combined.
Take the dough out of the fridge after its final rest and transfer it onto a lightly floured work surface. Using a rolling pin, roll it out into a rectangle about 50cm x 40cm. Spread the filling evenly over the dough, leaving a small strip clear of any filling along one of the long edges, then brush this strip with a little water (this strip will be used to seal the dough once it’s rolled).
Roll up the dough lengthways, gently pressing the filling-free edge into the dough to seal it.
Line a baking tray with baking paper, then cut the roll into 12 pieces about 5cm thick. Carefully transfer them to the prepared baking tray, then gently press them down by about 1cm, so they are about 4cm high, and cover with a tea towel. Leave to prove in a warm place for about 1 hour, until almost doubled in size and touching each other.
Preheat your oven to 200C / fan 180C / gas 6.
Bake the proved buns for 15 minutes, then turn the tray round and bake for a further 10 minutes, until golden brown.
To make the syrup for glazing the buns, just place all the glaze ingredients in a small saucepan. Heat on a low heat, just enough to dissolve the sugar, then turn the heat up to boiling. Lower the heat again and simmer fast for a couple of minutes, then take off the heat. You don’t have to make the glaze, but it does add a real sweet decadence to the buns.
Once baked, remove the buns from the oven and transfer them on to a wire rack, but leave them in the tray while you glaze them (so the sugary caramel gets absorbed into the buns). Brush the glaze generously over them, then eat warm, maybe with a nice dollop of cold whipped cream!
Reviews
Have you tried this recipe? Let us know how it went by leaving a comment below.
Our team will respond to any queries as soon as we can - this may take longer over weekends. You do not need to resubmit your comment.
Please note: Moderation is enabled and may delay your comment being posted. There is no need to resubmit your comment. By posting a comment you are agreeing to the website Terms of Use.
