Rocky Road Halloween Grave
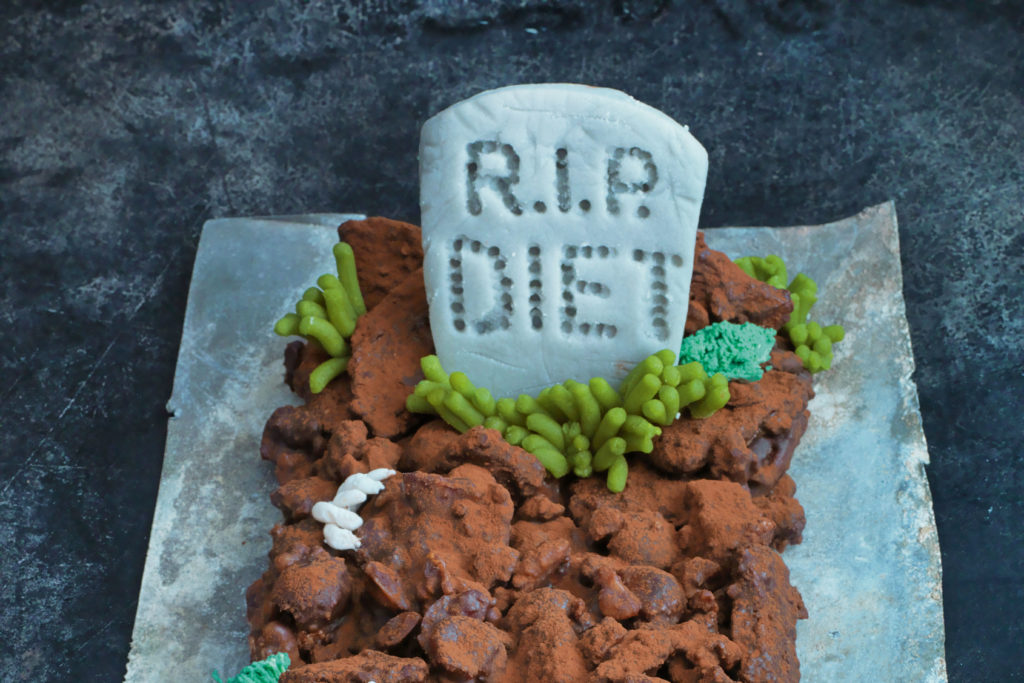
Rocky Road Halloween Grave by Konditor & Cook from the book Deservedly Legendary Baking. With White marzipan, chocolate biscuit cake mixture and mini marshmallows.
Introduction
Konditor & Cook are back with yet another showstopping Halloween recipe from their book Deservedly Legendary Baking. An adaptation of the classic Konditor & Cook Chocolate Biscuit Cake, this spooky rocky road recipe comes complete with a chocolate tombstone engraved using the end of a skewer! Pick out white marshmallows only for this, as the idea is they look like bones protruding from the grave!
Ingredients
| 200g | white marzipan |
| black, white and green food colourings | |
| 150g | unsalted butter |
| 100g | golden syrup |
| 200g | dark chocolate (54 per cent cocoa solids), chopped |
| 1 | medium egg, lightly beaten |
| 330g | digestive biscuits (or similar) |
| 60g | walnuts |
| 60g | sultanas |
| 100g | glacé cherries |
| 50g | mini marshmallows |
Method
1. Start with colouring the marzipan and making some of the decorations. Dye about 90g of the marzipan in grey for the tombstone, using a little black colouring and kneading it into the marzipan. This time it can be a bit marbled for a stone effect.
2. Divide the remaining marzipan into 3 and dye one piece white, to shape into some loosely scattered bones, one piece light green and the final piece in a darker green. It is better to shape the bones and tombstone well in advance and leave them to dry.
3.Roll the grey marzipan out into a 1.5cm-thick rectangular block, giving it a slightly arched top. Use the blunt end of a skewer to engrave the letters. For the bones, roll the white marzipan into pieces 3–4 cm long with a thick epiphysis at either end, using the rounded side of a skewer to shape the thick ends. Make some smaller ones too, or try shaping a skeletal hand.
4. The grassy additions can be done in advance or made fresh. To shape the darker grass, take small lumps of marzipan and press them through the mesh of a sieve. Use a small knife to cut off the ‘turf’ as it comes out on the other side. To shape the lighter, longer grass, press lumps of marzipan through a garlic crusher (a garlic crusher and a sieve are also a good hair-making technique for some funky gingerbread people).
5. To make the grave,line a small baking tray or rectangular dish with a sheet of baking parchment. Melt the butter and golden syrup together in a saucepan and then bring to the boil. Add the chocolate, reduce the heat to its lowest setting and stir with a whisk until the chocolate has melted.
6. Gradually add the beaten egg and continue to stir with the whisk until the mixture has thickened a little and formed a shiny emulsion. The egg will cook in the heat of the mixture but be careful not to let it boil (the temperature shouldn’t reach above 85°C). Remove from the heat.
7. Break up the biscuits into large chunks (quarters are fine), put them in a bowl and add the walnuts, sultanas and half the glacé cherries. Pour the hot chocolate mix over the dry ingredients and mix gently with a wooden spoon. Decant the mixture into the prepared tin, leaving the running chocolate on the side of the bowl for now. Press the mixture flat in the tin.Where you want to set the tombstone it helps to make an oblong hole and build up a bit of back support using some of the larger biscuit shapes in the mix. Overall there is no set rule to this: you can be as extravagant as you wish to be with your grave design!
8. Put the mini marshmallows in the bowl that contained the chocolate mixture and, using a spatula, coat them in the liquid chocolate from the side of the bowl. Sprinkle them in a loose pattern over the biscuit mixture, then place the remaining glacé cherries among them. Once you are happy with the basic shape, place in the fridge and leave for at least 3 hours or until set.
9. For the final assembly, remove the baking parchment from the base of the grave and put it in its final resting place – an oblong dish or a piece of slate perhaps. Dust lightly with the cocoa powder. Then set the tombstone in the cavity, using a little melted chocolate to stick it down, if necessary. Add the grass around the perimeter of the grave and around the base of the tombstone.
TIP: Use some extra marshmallows to scatter like bones over the top of the grave.
Reviews
Have you tried this recipe? Let us know how it went by leaving a comment below.
Our team will respond to any queries as soon as we can - this may take longer over weekends. You do not need to resubmit your comment.
Please note: Moderation is enabled and may delay your comment being posted. There is no need to resubmit your comment. By posting a comment you are agreeing to the website Terms of Use.
