








Feed your appetite for cooking with Penguin’s expert authors
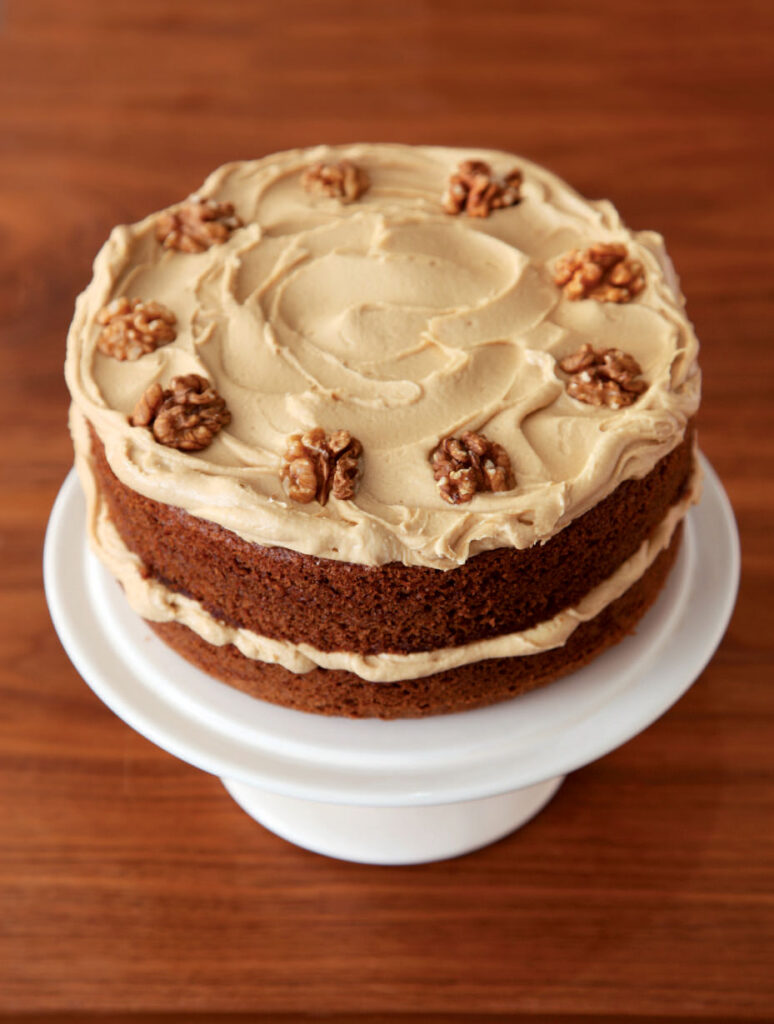
Nigella Lawson’s Coffee and Walnut Layer Cake


Introduction from Nigella Lawson
Neither of my grandmothers, nor indeed my mother, was a baker but this cake is nonetheless the cake of my childhood. When I was little, I used to make it for my younger sister’s birthday every year, beating away vigorously with my bowl and wooden spoon. This, however, is a simplified version: everything just goes into the processor.
The cake I made and ate when young was more milky coffee than espresso, but here I’ve bolstered it without consideration to my children. If that’s your constituency or concern here, or if you yourself have a nostalgic longing for muted sweet comfort, replace the 4 teaspoons of instant espresso powder with 2 teaspoons of instant coffee granules dissolved in a tablespoonful of boiling water.
Essential kit
You will need: 2 x 20cm sandwich tins.
Method
Preheat the oven to 180°C/gas mark 4. Butter the 2 sandwich tins and line the base of each with baking parchment.
Put the walnut pieces and sugar into a food processor and blitz to a fine nutty powder. Add the 225g butter, flour, 4 teaspoons espresso powder, baking powder, bicarb and eggs and process to a smooth batter. Add the milk, pouring it down the funnel with the motor still running, or just pulsing, to loosen the cake mixture: it should be a soft, dropping consistency, so add more milk if you need to. (If you are making this by hand, bash the nuts to a rubbly powder with a rolling pin and mix with the dry ingredients; then cream the butter and sugar together, and beat in some dry ingredients and eggs alternately and, finally, the milk.)
Divide the mixture between the 2 lined tins and bake in the oven for 25 minutes, or until the sponge has risen and feels springy to the touch.
Cool the cakes in their tins on a wire rack for about 10 minutes, before turning them out onto the rack and peeling off the baking parchment.
When the sponges are cool, you can make the buttercream. Pulse the icing sugar in the food processor until it is lump free, then add the butter and process to make a smooth icing.
Dissolve the instant espresso powder in 1 tablespoon boiling water and add it while still hot to the processor, pulsing to blend into the buttercream.
If you are doing this by hand, sieve the icing sugar and beat it into the butter with a wooden spoon. Then beat in the hot coffee liquid.
Place 1 sponge upside down on your cake stand or serving plate. Spread with about half the icing; then place on it the second sponge, right side up (i.e. so the 2 flat sides of the sponges meet in the middle) and cover the top with the remaining icing in a ramshackle swirly pattern. This cake is all about old-fashioned, rustic charm, so don’t worry unduly: however the frosting goes on is fine. Similarly, don’t fret about some buttercream oozing out around the middle: that’s what makes it look so inviting.
Gently press the walnut halves into the top of the icing all around the edge of the circle about 1cm apart.
Notes
Make ahead note:
The cake can be baked 1 day ahead and assembled before serving. Wrap cake layers tightly in clingfilm and store in airtight container. The buttercream can be made 1 day ahead: cover with clingfilm and refrigerate; remove from fridge 1–2 hours before needed to allow to come to room temperature then beat briefly before use. The iced cake will keep for 2–3 days in airtight container in a cool place.
Freeze note:
The un-iced cake layers can be frozen on day of baking, each wrapped in double layer of clingfilm and a layer of foil, for up to 3 months. Defrost for 3–4 hours on wire rack at room temperature. Icing can be frozen separately in airtight container for up to 3 months. Defrost overnight in fridge then bring to room temperature and beat briefly before use.





Reviews
Have you tried this recipe? Let us know how it went by leaving a comment below.
Our team will respond to any queries as soon as we can - this may take longer over weekends. You do not need to resubmit your comment.
Please note: Moderation is enabled and may delay your comment being posted. There is no need to resubmit your comment. By posting a comment you are agreeing to the website Terms of Use.