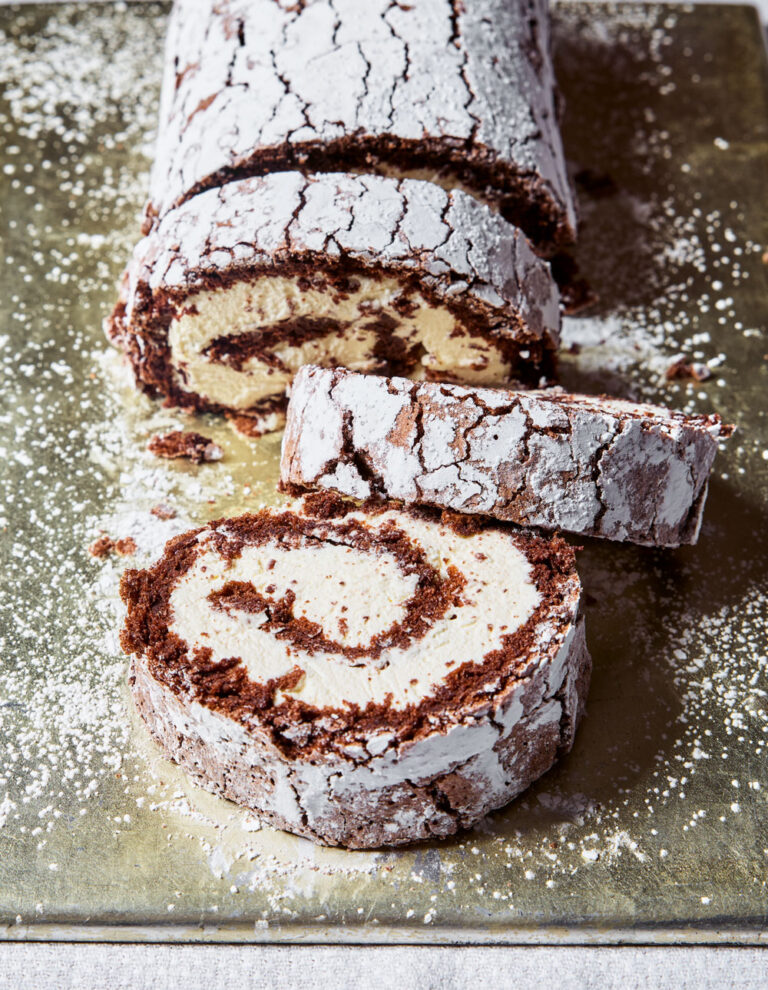
Simple Swiss Roll

A timeless cake for your baking repertoire. From the GBBO: Learn to Bake recipe book, this easy swiss roll can be filled with varying jam and buttercream duos.

Introduction
This is a classic cake – a very light, rolled-up sponge. The mixture is made by whisking eggs and sugar together to trap millions of tiny air bubbles – these are what make the sponge rise.
Ingredients
| 3 | eggs, at room temperature |
| 75g | caster sugar, plus extra for sprinkling |
| 75g | plain flour |
| For the filling: | |
| 2 | medium Bramley cooking apples |
| 2-3 tbsp | caster sugar, to taste |
| 3 tbsp | Greek-style yoghurt |
Method
Kit you will need: large bowl for mixing; hand-held electric mixer; large sieve; large metal spoon; plastic or rubber scraper; swiss roll or baking tin 20 x 30cm, greased with butter and the base lined with baking paper; large sharp knife; wire rack; vegetable peeler; chopping board; small sharp knife; medium saucepan; wooden spoon; medium spoon.
Preheat the oven to 220°C/425°F/gas 7. Break the eggs into the mixing bowl and whisk with the electric mixer on high speed for a few seconds until the yolks have broken up and the eggs look a bit frothy.
Add the sugar and whisk, still on high speed, for about 5 minutes until the mixture becomes much paler in colour and really thick and fluffy. It is whisked enough when it has reached the ‘ribbon stage' (ie. when you lift your whisk out of the bowl, you can write your initials in the bowl with the ribbon-trail of mixture that falls off the whisk).
Sift the flour onto the foamy egg mixture. With the edge of the large metal spoon, fold the mixture until you can’t see any streaks of flour.
Carefully scrape the delicate mixture into the prepared tin and gently spread it into the corners. Place in the heated oven and bake for 9-10 minutes until the sponge is golden brown. To test if it is cooked, use the fingertip test; if necessary, bake for another minute, then test again.
Lay a sheet of baking paper about 30 x 40cm on the worktop. Sprinkle it with a little caster sugar. Wearing oven gloves, turn the tin over on the sugared paper and shake gently to remove the cooked sponge, then lift off the tin. Peel off the baking paper.
With the large sharp knife, make a shallow cut along one short end of the sponge, about 2cm in from the edge. (This will help give the roll a neat spiral when it is sliced.) Starting from the end with the cut, gently roll up the warm sponge with the paper inside (so the paper is rolled up too). Set the roll on the wire rack and leave it until cold.
To make the filling, peel the apples with the vegetable peeler, then set them on the chopping board. Cut them into quarters. Cut away the cores, then cut each quarter into 4 or 5 thick slices.
Put the apples into the saucepan with 4 tablespoons water. Set the pan over medium-low heat and cook, stirring every minute or so with the wooden spoon, until the apples feel soft and start to break up when prodded with the spoon. Turn up the heat to medium and cook, stirring constantly, for a couple of minutes until you can no longer see any liquid and the mixture is thick and jam-like rather than runny. Carefully remove from the heat and leave to cool.
Add 2 tablespoons sugar and the yoghurt to the cold apples and stir to mix well. Taste the mixture and add a little more sugar if it isn’t sweet enough.
Carefully unroll the sponge. Spoon the apple mixture over the surface and spread evenly. Gently re-roll the sponge from the end with the cut (it will now have a ‘memory’ and rolling should be easy). Be sure you leave the paper on the worktop. Sprinkle with a little more sugar and serve as soon as possible. The roll can be kept, tightly covered, in the fridge for up to 24 hours – take out an hour before serving.
Spread 6 tablespoons strawberry jam over the sponge. Whip 200ml whipping cream in a mixing bowl using a hand-held electric mixer until thick. Spread on top of the jam, then roll up the sponge. Serve as soon as possible.
Reviews
Have you tried this recipe? Let us know how it went by leaving a comment below.
Our team will respond to any queries as soon as we can - this may take longer over weekends. You do not need to resubmit your comment.
Please note: Moderation is enabled and may delay your comment being posted. There is no need to resubmit your comment. By posting a comment you are agreeing to the website Terms of Use.