Jewel Box Cake
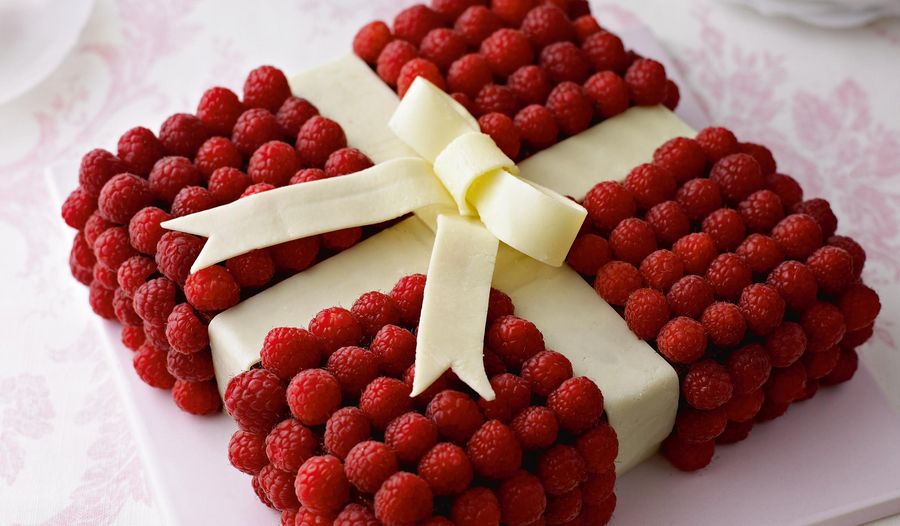
Now this is what we call a showstopping cake. White chocolate sponge cake is covered with raspberries and decorated with white chocolate ribbons, like a beautiful box. Stunning!
From the book

The Great British Bake Off: How to Turn Everyday Bakes into Showstoppers
Showstopping recipes from the Great British Bake Off

Sweet and savoury bakes from your favourite judges and bakers

Fail-safe recipes for every occasion
Introduction
Looking as special as its name suggests, this is a square white chocolate sponge cake, completely covered with small raspberries and decorated with white chocolate ribbons, tied to look like a beautiful jewel box.
Ingredients
| For the sponge: | |
| 150g | good-quality white chocolate, broken up |
| 250g | unsalted butter, softened |
| 250g | caster sugar |
| 1 tsp | vanilla extract |
| 4 | large free-range eggs, at room temperature, beaten |
| 250g | self-raising flour |
| good pinch of salt | |
| For the chocolate ribbons and bow: | |
| 150g | white chocolate, broken up |
| 3 tbsp | liquid glucose |
| To finish: | |
| about 4 tbsp | seedless raspberry jam, for brushing |
| 500–600g | small raspberries |
Essential kit
You will need: A heatproof bowl and pan, a rolling pin, a ruler, a large sharp knife, sharp kitchen scissors and a 1 x 20.5cm square deep cake tin, greased and lined.
Method
1 Preheat the oven to 180°C/350°F/gas 4. Melt the chocolate. Leave
to cool until needed.
2 Put the butter into a large mixing bowl and beat with an electric mixer until creamy. Gradually beat in the sugar, then add the vanilla and beat until the mixture is very light in colour and fluffy in texture, scraping down the bowl from time to time. Gradually add the eggs, beating well after each addition and adding a tablespoon of the weighed flour with the last portion of egg (to prevent curdling). Sift the rest of the flour and the salt into the bowl and fold in using a large metal spoon. Add the cooled white chocolate and fold in until all the ingredients are completely amalgamated.
3 Spoon the mixture into the prepared tin and spread evenly. Make a small hollow in the centre so the cake will rise evenly. Bake for about 1 hour until golden brown and just firm to the touch and a wooden cocktail stick inserted into the centre of the cake comes out clean. Leave to cool for about 15 minutes, then carefully remove from the tin and cool completely on a wire rack. Once cold the cake can be wrapped well and stored in an airtight container for a day before finishing.
4 When ready to finish, set the cake on a serving board or platter. Make the chocolate ribbons and bow (see method below).
5 Gently warm the raspberry jam until melted. Brush over the top and sides of the cake, then gently press the ribbons onto the cake – across the top and down the sides – to resemble a parcel. Starting with the top of the cake, press the raspberries (pointed end up) onto the sponge in the squares between the ribbons, so the whole cake is covered, top and sides. Fix the chocolate bow in place with a dab of jam or chocolate. Serve the cake the same day.
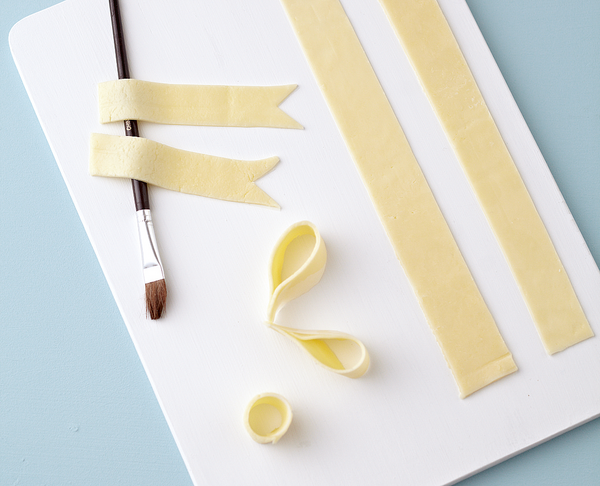
To make chocolate ribbons and bow:
1 Melt your chopped dark, milk or good-quality white chocolate; remove the bowl from the pan and gently stir in liquid glucose. Leave to thicken at room temperature. Once the mixture is firm and almost set, mould it into a ball with your hands. (Some types and brands of chocolate need to be chilled to firm up.)
2 Work and knead the mixture in your hands so it softens and becomes pliable and glossy (just like modelling clay or play-dough). As soon as it feels smooth, shape it into a sausage.
3 Set the sausage between 2 long pieces of baking paper and roll out into a long, flat sheet. Peel off the top piece of paper. To make the crossed ribbons for the Jewel Box Cake, cut out 2 strips about 30 x 2.5cm, using a ruler and a long, sharp knife to get a straight, sharp edge. If the ribbons feel very soft, firm up in the fridge for a few minutes. Attach the strips to your cake.
4 To make a bow, cut out 1 strip about 10 x 2.5cm, 2 strips 11 x 2.5cm and 2 strips about 14 x 2.5cm, cutting through the paper to leave the strips attached. Snip triangles out of one end of the 11cm strips using scissors, then rest the strips over a small paintbrush or similar implement to create a slight curve; these will be the bow ends.
5 With the paper side out, bend each 14cm strip into a bow loop and press the ends together. Then peel off the paper and position the ends of the loops so they are slightly overlapping; press gently together. Peel the paper from the 10cm strip, then wrap it around the centre of the loops in a ring to hide the join; press the ends of the bow ring to seal. Put all the shaped pieces in the fridge so they can firm up a bit.
6 Position the bow on top of the crossed ribbons on the cake, fixing in place with a dab of melted chocolate or jam if necessary. Reshape the loops and bow carefully until you are happy with the shape. Slot the bow ends under the loops and arrange over the cake.