Focaccia

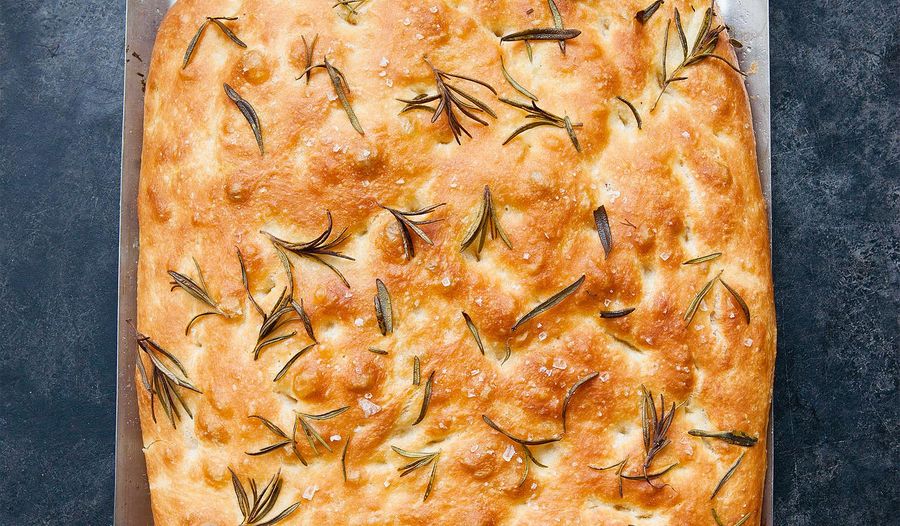
This Italian bread from James Morton is a must for any dinner table. This traditional focaccia recipe is finished with quality sea salt, rosemary and olive oil.
From the book

Brilliant Bread

Learn to make perfect bread

No-nonsense tips and tricks

Simple recipes with impressive results
Introduction
To define a bread is to define the finished product, not the process by which it is made. This is the defence of my focaccia recipe, which is not traditional by any means.
Your creation will be fantastic, though, and conform to one of the most unashamedly delicious bread styles there is. By the process of making it, you will become capable of dealing with the very trickiest of wet doughs. And this dough is really, really wet. Once the initial quantity of flour is added, put the flour back in the cupboard so you aren’t tempted to add any more.
No matter how it turns out, rarely does this bread get a chance to be used for any purpose other than ‘hot, straight out the oven’. But it’s great with any soup, and although I tend to drench it in sea salt and oil, it can be a healthier alternative to everyday buttered bread. Cut it horizontally and stuff with cured meats and sundried tomatoes for a beautiful Italian sandwich.
Ingredients
| 500g | strong white flour |
| 10g | salt |
| 1x 7g | sachet fast-action yeast |
| 400g | tepid water |
| 40g | olive oil, plus extra for drizzling |
| Sea salt for sprinkling |
Method
1. In a large bowl, weigh the flour. With your fingers, rub in the salt at one edge of the bowl, and the sachet of dried yeast on the opposite side. Try to keep the yeast and salt apart, as the salt can stop the yeast working.
2. Add the water and the oil to the dry ingredients, and mix together using a rigid spoon. Trust me. This dough will be very, very wet – almost like cake mix. If you can, wet your hands (to stop them sticking) and fold the dough over a little, just to see what a dough of this wetness (or ‘hydration’) feels like.
3. Cover the dough with a damp tea towel or cling film and rest for 40 minutes somewhere warm.
4. Once the dough has risen a little, it’s time to get your hands in. Drizzle the fingertips of one hand with oil, and scoop them down between the dough and bowl, lifting the dough away from the side of the bowl. Then, fold the dough over itself, pressing down quite hard so it sticks. Notice how it kind of holds its shape, but slowly sags back down? Well, we want this sagging to happen as little as possible. Turn the bowl a quarter turn, and repeat until you have a dough that feels like it can support itself a lot more than it could before. Cover your dough again and rest for another 50 minutes, or for 8–12 hours in the fridge during the day or overnight.
5. Once the dough has nearly doubled in size again, generously douse a baking tray with olive oil. Turn your risen dough out on to this tray. It will begin to sag and flatten, so using oiled hands fold it in half, and then half again. Notice how it now holds its shape?
6. Now you want to flatten it out as much as you can. This can be quite tough, but try to get it right to the edge of the baking tray. Leave your dough to prove for a final 50 minutes. Alternatively, you can leave your dough in the fridge overnight or during the day.
7. Preheat your oven to 220°C/gas 7 about 20 minutes before you’re going to bake. Once your dough is proved, use your fingertips to press down hard into the dough to make little indentations. Don’t be scared; press really forcefully, right down to the baking tray. You won’t tear the dough. Drizzle with a little more olive oil and sea salt and bake for 20–25 minutes, or until golden.
Time spent in the kitchen: 5-10 minutes. Time taken altogether: 3 hours.